As a lightweight and cheaper alternative to traditional tiles and felt roofing, Onduline roofing sheets are hard to beat. Perfect for garden sheds and most outbuildings, these durable sheets are quick and easy to install. But if you need to know how to fit Onduline roofing sheets, the good news is you don’t need to be an expert.
Bituminous Onduline roofing sheets are the tough roofing material of choice for many installers. Each piece has a baseboard produced from recycled cellulose fibres. It’s then steeped in bitumen under heat and pressure, to give its well known flexibility, waterproofing, and sound absorbing qualities.
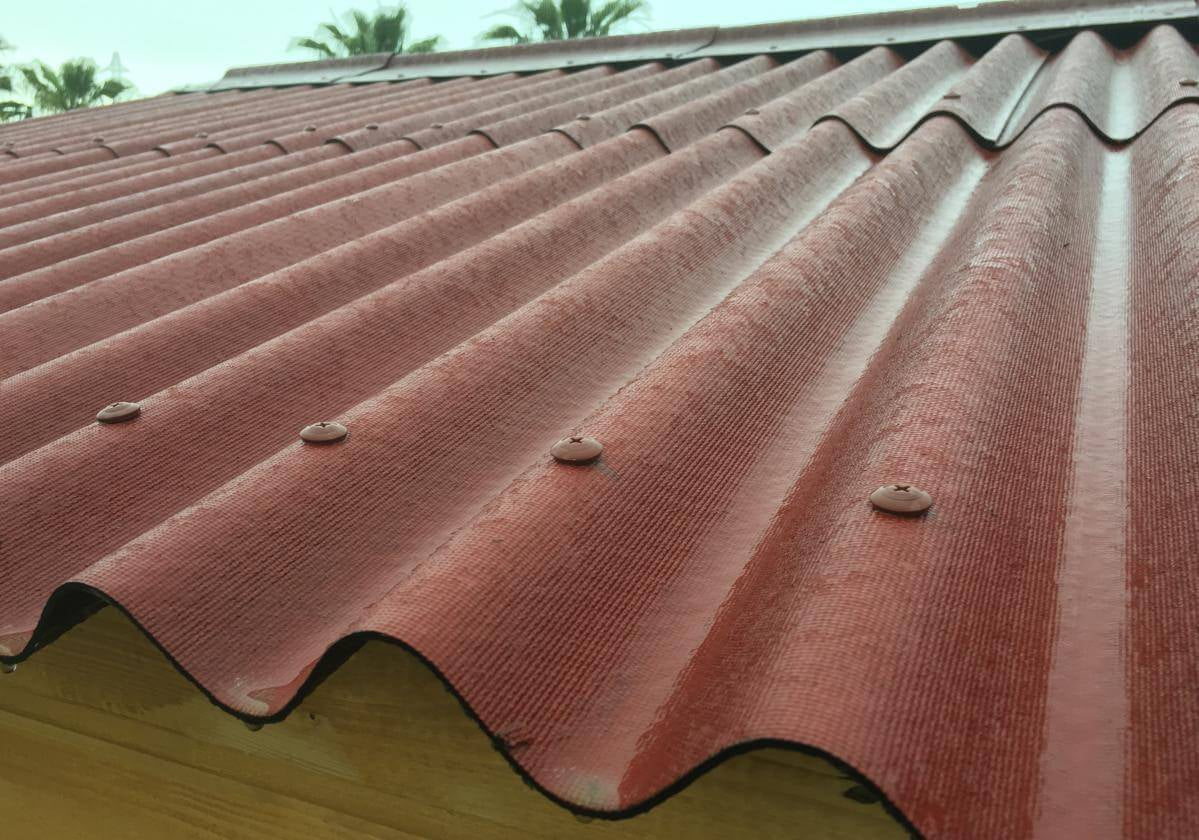
Unlike common felt roofing, the 950mm x 2000mm, 3mm thick Onduline roofing sheets have a 15-year waterproofing guarantee and excellent UV resistance. So they won’t crack, split or become brittle, and will remain maintenance free for many years. And, designed to look like standard corrugated iron roofing, you have a choice of four environmentally-friendly colours.
How To Fit Onduline Roofing Sheets
You don’t need to be a roofing expert when fitting Onduline sheets, but it would obviously help if you have a little DIY experience. However, if you follow these fixing instructions, you’ll finish up with a low-cost, low maintenance, and durable roof.
But first, it’s always a good start to make sure you have the right tools and the right information for any DIY job. And fitting your Onduline roofing sheets is no different, so make sure you have the following kit before you start:
- Protective gloves, glasses, and hard hat
- Course blade hand saw or electric rotary saw
- Hammer
- Tin snips
- Roofers knife
- Tape measure
- Spray lubricating oil
- Straight edge
Also, by checking your roof pitch angle, you’ll be able to fit the sheets to the roof structure and secure them accordingly. Depending whether your roof pitch is 5º to 10º, 10º to 15º, or 15º or steeper, you’ll need differing sheet overlaps which will affect the number of sheets you need. This will also affect the number off fixings required.
Step 1: Cutting Your Onduline Sheets
Once you’ve checked how many Onduline roofing sheets are required, you’ll need to measure the size of the sheet and mark out where it needs to be cut (remembering to keep a minimum of 5cm eave overhang). Cutting across the corrugation can be done with either a handsaw or electric power saw.
If you’re using a hand saw, make sure you spray lubricating oil onto the blade before you start cutting, and at regular intervals throughout - this will avoid the bitumen sticking to the blade. If you’re using a power saw, you shouldn’t need additional lubrication, but always wear safety equipment, and refer to the manufacturer's manual for instructions and safe operation.
To cut up the corrugation (between the ridges), you can use a roofers knife to deep score the Onduline sheet. You can then fold the sheet along the score line to separate the cut sections.
Step 2: Fixing Your Onduline Sheets
There’s a range of cost effective Onduline fixings available to help you affix your sheeting to differing roof structures. Whether you choose nails or screws, each option comes with a coloured, waterproof cap attached (to match your roofing sheets). Depending on your roof pitch, you may need additional fixings.
It’s advisable to start fitting your roofing sheets at the opposite end of the roof from the prevailing wind. Then start alternate sheet courses with a half sheet to form a broken bond sheet layout. This will avoid having a thickness of 4 sheets to nail through where corners meet.
Using Onduline plastic-capped Monobloc nails are the standard fixings for your roofing sheets, attached at predetermined points, relevant to your roof pitch. These are hammered through the sheet and into the roof structure on every raised corrugation and sheet overlaps, and either side of vertical joints.
Step 3: Eaves, Verge, And Ridge Fixing Details
Once you’ve fixed all the roof sheets, you’ll need to give your new look roof the finishing touches and details it needs to keep it clean, watertight and looking sharp all year round.
While you can leave your roofing sheets with a nominal 5cm eaves overhang, for a tighter finish with less overhang, why not install an Eaves Tray to ensure water run-off doesn’t seep into any woodwork? There’s also the Ventilator Comb - fixed to the eaves and ridge, it works to prevent birds and larger insects getting into the roof space, while allowing ventilation airflow.
To seal the eaves, Corrugated Eaves Fillers will close the gaps in the corrugation, while supporting your roofing sheets, and preventing wind lift. And to give roof-end protection with the same material, Verge Piece Fixings are easily attached to the verges, giving you a weathertight detail, and a professional, colour coordinated finish.
A colour coordinated Ridge Unit Fixing gives you another weathertight finish along your roof ridge, as well as providing high level ventilation. Like the installation of the roofing sheet themselves, it’s best to secure your ridge fixings starting at the opposite end of the roof from the prevailing wind.
With the exception of the eaves tray which you’ll need to put in place before you add the final roof sheet nail fixings, all the additional details can easily be added once your roofing sheets are in place and secured. No additional specialist tools or equipment are required to add any of these details - in fact, all you need are further Onduline nail or screw fixings and your hammer or screwdriver!
Let Us Help You
There are also plenty of additional details which you can add depending on the type of roof you have, and the finish you want. Hip or Valley details, roof ventilators, and end or side wall abutments can all add quality and weathertight touches to your building.
So, beyond this fixing guide, if you need extra help on how to fit onduline roofing sheets, advice as to which fixings would be best for you and your roof, or further information on anything in the Onduline range, Get in touch with us today! Call 01752 466151, or email us on sales@roofingsuppliesuk.co.uk and we’ll be happy to help.