What is RoofArt Guttering?
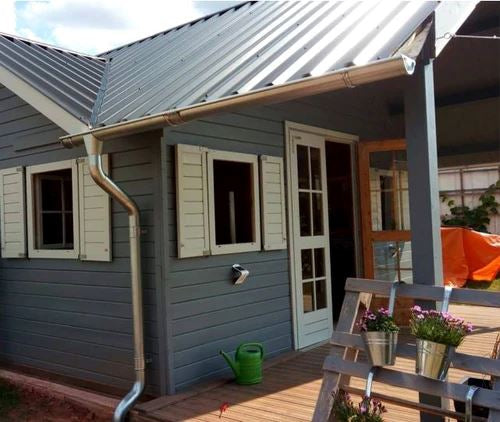
RoofArt Guttering is not just another element in the construction landscape. It represents a significant evolution in the seamless integration of practicality and aesthetics in guttering systems. Crafted from superior quality galvanised steel, RoofArt Guttering does more than just channel rainwater away from your buildings — it enhances the elegance and charm of exteriors without compromising on durability.
As we unravel the various features and benefits of RoofArt Guttering, we will delve into why it stands out from the crowd, its superior design that merges form and function, and why it is fast becoming a preferred choice for industry professionals and homeowners alike. Read on to find out why RoofArt Guttering is rewriting the rules of the game!
Why Choose RoofArt Guttering?
Choosing RoofArt Guttering provides several key advantages, making it an appealing option for homeowners, roofing professionals, and DIY enthusiasts alike. Here is why:
Durability and Strength: Constructed from high-quality galvanised steel, RoofArt Guttering is designed to last. It can withstand a wide range of weather conditions, from torrential rainfall to extreme temperature fluctuations, ensuring its longevity and dependable performance.
Aesthetically Pleasing: One of the unique selling points of RoofArt Guttering is its aesthetic appeal. It is not merely about functionality; it is about enhancing and enriching the overall exterior of a building. Available in a spectrum of colours and finishes, it can be tailored to suit any architectural style or personal preference.
Easy Installation: RoofArt Guttering is engineered for ease of installation, making it an optimal choice for professionals and DIY enthusiasts alike. Its precision-made components ensure a seamless fit and a straightforward assembly process.
Low Maintenance: The durability of galvanised steel and quality of construction means RoofArt Guttering requires minimal maintenance. Regular checks and simple cleaning routines are usually enough to keep the system functioning optimally, saving time and effort overall.
Cost-Effective: While the initial investment may be higher than traditional options, the durability and minimal maintenance of RoofArt Guttering systems mean that over time, it can be a more cost-effective solution.
Tools and Materials: Preparing for Installation
Before we dive into the step-by-step guide to installing your RoofArt Guttering, let's first gather all the tools and materials you'll need. A well-prepared workspace is key to a smooth and efficient installation process. For this project, you'll need:
- Gutter sections
- Gutter brackets and screws
- Downspouts
- Outlet connectors
- Gutter corners (if necessary)
- End caps
- Gutter sealant
- Measuring tape
- Ladder
- Power drill
- Screwdriver
- Hacksaw
Taking the Steps:
Plan the Layout: Start by assessing the layout of your home. You'll need to plan where your downspouts will be located and how the gutters will direct the water to these areas. Consider the roofline slope and the home's architecture. The goal is to direct water away from the foundation effectively.
Measure: Measure the length of your roofline where the gutter will be installed. This will tell you how much guttering you need. Always purchase slightly more than measured to account for waste and errors.
Install the Gutter Brackets: The brackets will be what holds your gutter to your home. Depending on the type of gutter you've chosen, you may need to screw these into the fascia board directly or mount them on the roof. Follow the manufacturer's instructions regarding the spacing of the brackets. Usually, they should be spaced every 2-3 feet.
Prepare the Gutter Sections: If your gutter sections need to be cut to fit, use a hacksaw to trim them to the appropriate length. Use a gutter sealant to seal any seams.
Install the Gutters: Attach the gutter sections to the brackets. Make sure they're secured tightly. Ensure the gutters slope slightly towards the downspouts for effective water flow. A good rule of thumb is a slope of 1/2 inch for every 10 feet of gutter.
Install the Downspouts: First, install the outlet connector on the gutter at the location where you want the downspout. Then connect the downspout to this outlet. Make sure the downspout directs water away from your home's foundation.
Install End Caps: Install the end caps at the end of the gutter runs. Apply a good amount of gutter sealant to prevent leakage.
Test the System: Once everything is installed, use a hose to run water through the gutter and down the downspouts. Watch for leaks or areas where water pools in the gutter.
Remember, every installation is unique, and it's essential to follow the specific instructions that come with your product. It's always recommended to consult with or hire a professional if you're unsure about any steps in the process.
Safety Practices:
Gutter installation can involve potential risks if safety guidelines are not strictly adhered to. Here are some safety practices to keep in mind:
Use a Stable and Suitable Ladder: Make sure the ladder is sturdy, in good condition, and is placed on a solid, flat surface. An extension ladder is often a good choice for gutter work. Never overreach when you're on a ladder; instead, move the ladder when necessary.
Wear Protective Gear: Use heavy-duty gloves to protect your hands from sharp metal edges. Safety goggles are recommended to protect your eyes from any metal shards or other debris. Wear a hard hat if there's any risk of falling objects.
Avoid Working in Adverse Weather Conditions: Never work on the roof or a ladder during windy, rainy, or icy conditions. Wet roofs and ladders can be extremely slippery, which can lead to accidents.
Electrical Safety: Be aware of any power lines or electrical wires around your house. Contact with these can cause serious harm or even death. If your work area is near power lines, consider hiring a professional.
Use the Right Tools: Always use the right tools for the job and make sure you know how to use them properly. Misusing tools can lead to accidents.
Clear the Area: Make sure the ground area where you're working is clear of people, pets, and hazards. Falling tools or debris could cause injury.
Be Aware of Your Surroundings: Always be aware of where you are on the roof and where the edges are. Keep your work area clean to avoid tripping or slipping.
Don't Work Alone: Having someone else present can help if an accident occurs. They can also help stabilise the ladder and hand up tools.
Follow Manufacturer's Instructions: This includes recommendations for installation as well as any specific safety instructions.
Don't Rush: Work patiently and deliberately. Many accidents happen when people try to hurry.
If you're uncomfortable or unsure about any aspect of the installation, it's always safer to hire a professional. Safety should always be your top priority!
Choose your RoofArt Guttering with Roofing Supplies UK
At Roofing Supplies UK, we are expert retailers of RoofArt Guttering products, and we're ready to help you choose the best option for your needs. We have a range of RoofArt available so email us at sales@roofingsuppliesuk.co.uk, call us at 01752 466151, or order online 24 hours a day, seven days a week. We’ll be able to help you purchase your RoofArt now.